The most apparent issue with the carbine was the paint that was slapped carelessly onto the stock by one of the previous owners. It was a dark brown gloss that was carelessly applied without proper preparation of the wood, so it started to fall off the stock even before I started working on it.

But before I started to apply any sort of chemical assistance in removing the paint, the carbine needed to come apart to prevent damage to the finish on the metal parts. Taking down an M44 isn't that complex really, at least to the level that is needed for this level of restoration.
First, the bolt is removed by fully opening it, then pulling the trigger and pulling the bolt back out of the receiver. With the bolt out, the bayonet is extended to allow access to the barrel bands on the front. These bands hold the top handguard to the rest of the stock and are held in place by a pair of retaining springs set into the stock. I won't remove the springs from the stock for this, instead, they'll just be masked off for this part of the project.


The barrel bands are a bit of a challenge since the springs need to be depressed enough to let the bands slip over them. In the end, it took three hands to depress the rear spring and force the band over the top of it. A set of needle nose pliers were used to depress the springs, and the metal and wood of the stock was protected by an old tee shirt.

Once the barrel bands were off, the upper handguard was removed and set aside for later. Something interesting about the handguard is that the tooling marks from when it was made are still clearly visible on the inside.


With the handguard and barrel bands off, there are only two screws that keep the barrel, magazine, and receiver attached to the stock. These screws are located right in front of the magazine on the bottom of the rifle, and the other is located on the top right at the rear of the receiver. They come out, the magazine and trigger guard come out of the bottom, and then the barrel and receiver can come out of the stock after some gentle tapping on the table.


Now there are a handful of metal components that will remain in the stock while the paint is being stripped. The two barrel band retaining springs, the stock cap at the very front, the stock bolt, and a few internal components that aren't going to be a concern for removing the paint. The last metal to be removed is the buttplate, which is held in place with a pair of screws.

Now that the carbine is disassembled, it's time to mask off the permanent metal fixtures. Painters tape did the job well enough without damaging the finish of the metal. After the metal was masked, it was time to start stripping the paint.


Citristrip is a citrus based paint stripper that can be used comfortably indoors, which is why it was the first choice for removing the paint. The amount of time I let the Citristrip sit on the paint varied, but for most of the paint, it was about an hour. The stock was done in sections and when the stripper had set for the proper time I used a plastic scraper to knock off the paint. Some areas needed more coats to remove the paint properly, but this was the general pattern on how the bulk of the paint was removed.


Series of the handguard during the first round of paint stripping.


The right side of the butt as it started and how it looked after the first application and scraping.
This was the time when the wood putty was discovered. The sling holes in the stock were filled with the stuff, as was the channel for the cleaning rod, most small nicks, and dings in the stock were also filled in, and a large section around the where the end of the bayonet sits when folded is entirely sculpted from the stuff. On one hand this sucks, on the other hand, at least it is just wood putty and not proper wood filler. Actual filler hardens so that it can be sanded, painted, stained, much like regular wood. Putty, on the other hand, can be softened easily by many things, including the Citristrip which made removal simpler, if not entirely easy.

After several applications of Citristrip to the stock holes and the cleaning rod slot, the putty was finally removed entirely and it was time for the next phase of the preparations.
The entire stock was rubbed with very fine sandpaper, then with some tack cloth to remove the dust, and then rubbed with mineral spirits to remove the last of the residue from the paint and the stripping compound. Historically, the stocks were given a treatment of linseed or tung oil before a coating of a clear varnish was applied to preserve the wood.
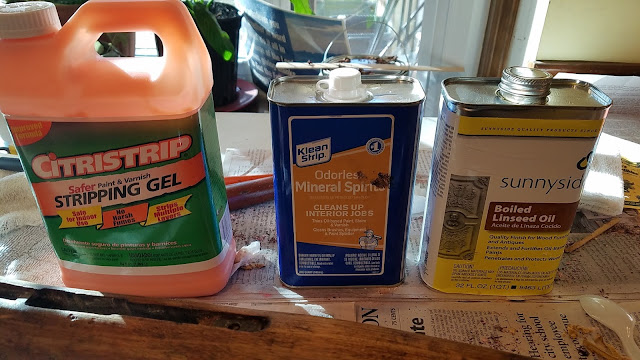


The boiled linseed oil was mixed with the mineral spirits in a ratio of one part linseed oil and two parts mineral spirits, which was then applied with a clean cloth to the entire exterior of the stock. Each coat needed to be allowed to set for several hours, so I let them sit overnight before I applied another coat.
However here is where the first part of the stock restoration ended, since the required clear coat needs a temperature over 50 degrees for an extended period. And since it is very, shall we say aromatic, it is something that is best done outside or in a very well ventilated space.

Here is where the project sat until the end of winter, but that's for the next part of the series.
Comments
Post a Comment