
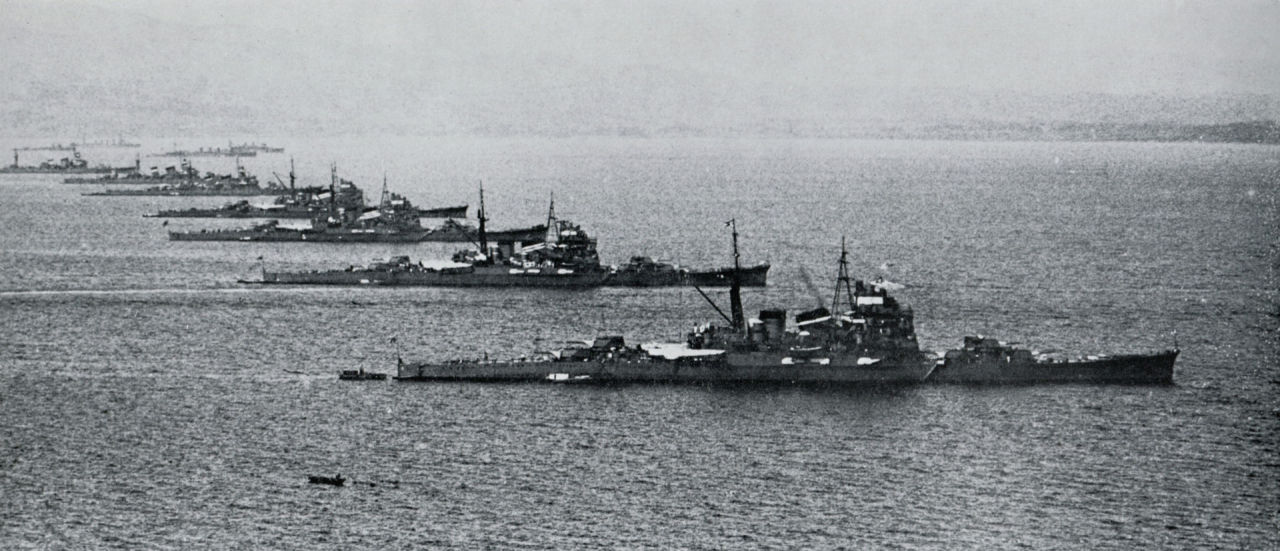
Chokai was the last of the four-strong Takao class of heavy cruisers built for the Imperial Japanese Navy in the late 1920s. Imperial Japanese designers worked for several years under the restrictions of the Washington Naval Treaty to make warships that were superior in quality to their American and British opponents, but the tonnage limitations imposed by the treaty made designs that would satisfy the General Staff almost impossible.
When combined with the rapid pace of construction, several technical failings emerged during the trials of many of these ships, including the Takao class. Despite material changes, welding in several parts of the superstructure, and the heavy use of aluminum, the ships suffered from concerns about stability for their entire service lives.

Laid down on March 26th, 1928, Chokai was launched on April 5th, 1931, and formally commissioned on June 30th, 1931. Coincidently, the same day as Maya, another of the Takao class. For the next several years Chokai was a member of Cruiser Division 4, with the other three members of her class.
They participated in several cruises near China and in a multitude of exercises until 1936.

From May to July Chokai's hull was strengthened at Yokosuka, and starting October 31st, 1936, she went into the yards for major renovation. New turbines, new AA guns, a new mast, and some other changes took until July 31st, 1937.
The next major event was the start of the Second World War, where Chokai participated in several of the early operations in Southeast Asia, including convoy escort, assisting in the Hunt for Force Z, and the destruction of ABDA forces.
In March 1942, the IJN made a raid into the Indian Ocean with impressive results. The British aircraft carrier HMS Hermes, the heavy cruisers Cornwall and Dorsetshire, and the destroyers Tenedos and Vampire were all sunk. Additionally, several ports were raided on the island of Ceylon and the Indian mainland, and more than 25 merchant vessels were sunk for the loss of around 25 Japanese aircraft.
After a short refit at Yokosuka, Chokai was assigned to the occupation force for the Midway Invasion operation, with the intention of providing support to the Special Naval Landing Forces while they assaulted the atoll. However, the destruction of the Kido Butai and the resulting loss of Japanese air cover on June 4th resulted in the failure of the operation, and Chokai returned to Japan.

Chokai's next combat would be in August, near the island of Guadalcanal. On the night of August 9th, Chokai acted as the flagship for Vice Admiral Mikawa as the 6th Cruiser Division went into the Battle of Savo Island, a mostly one-sided beating of the Allied naval forces in the waters off the island.
Four Allied heavy cruisers were sunk (Canberra, Astoria, Vincennes, and Quincy) by the combined weight of gunfire and torpedoes from the Japanese force, and another survived with heavy damage. Despite the surprise of the attack, two Japanese cruisers were damaged by return fire, including Chokai. Quincy and Astoria succeeded at hitting Chokai's Number I turret, disabling it and killing 34 of the crew inside. Repairs are made at Rabaul over the next several days.
For the rest of 1942, Chokai participated in bombardments of Henderson Field and escorted Tokyo express convoys to the island. For several more months most of Chokai's time was spent escorting convoys, and in some minor refits that added newer radar and more AA guns.
In June 1944, she was part of the Mobile Force at the Battle of the Philippine Sea, a colossally one-sided battle that saw the loss of three Japanese aircraft carriers, three more carriers damaged, damage to several surface combatants, and the loss of more than 700 aircraft. Chokai emerged unscathed from the battle.

October 1944 would see the end of Chokai. In an effort to halt the American landing on the island of Leyte, the IJN put together a massive operation to divert the main striking power of the US navy away from the island, so that their battleships and cruisers could attack the vulnerable transport ships in the gulf.

The Center Force under Admiral Takeo Kurita comprised four battleships (including Yamato and Musashi, the largest battleships ever built), ten heavy cruisers, two light cruisers, and fifteen destroyers. Despite two devastating attacks on the 23rd and 24th by American submarines and aircraft (which sank two of her sister ships and critically damaged another), Chokai made it into the gulf for what would have been the main event.
During the Battle off Samar on October 25th, the Center Force totally failed to utilize its advantage in survivability and firepower and was turned back by the boldness and audacity of the Americans in the small task forces that were supporting the marines on the island. For the loss of an escort carrier, two destroyers, a destroyer escort, several aircraft, and damage to several other warships, the Japanese lost three more heavy cruisers and another three were seriously damaged.
At 0558 the Center Force opened fire on Taffy 3, by 0850 Chokai started to take 5'' shellfire from the guns on the escort carriers and destroyer escort Roberts. It is probable that several of there were from USS White Plains (CVE-66).
Less than ten minutes later, reports indicate a large explosion, long believed to be from Chokai's torpedoes detonating from a near hit by a 5'' shell. Her engines and rudder were disabled, and she fell out of formation. At 0905, a flight of four TBM Avengers from Kitkun Bay score a hit with a 500 pound bomb on the stern, and they report billowing smoke.
Towards the end of the hour, the heavy cruiser Tone reports that Chokai is dead in the water. Kurita orders the destroyer Fujinami to escort the stricken cruiser away a few minutes after 1000, and the destroyer takes off the survivors. At last, at 2148 hours Fujunami reports that she had scuttled Chokai with torpedoes.
But even after their ship was sunk, Chokai's crew weren't safe. On October 27th, while diverting to pick up more survivors from another lost Japanese ship, aircraft from USS Essex attacked Fujinami in the afternoon. Fujunami was sunk with all hands, including all of the survivors from Chokai.
On May 5th, 2019, the R/V Petrel located Chokai at a depth of 16,970 feet (5,173 meters), and on May 30th they conducted an ROV survey of the wreck.
The Wreck

Chokai is resting upright, her bow broke off in front of the Number I turret and is resting about 980 feet (300 meters) away, an aircraft catapult also broke away, and the rear deck has fallen in. Aside from that, most of the ship is in one piece.

The anchor is still in place on the starboard side of the bow, which has come to rest inverted on the seabed. This is a typical 5.5-ton anchor used by the Imperial Japanese Navy, as can be seen in the diagram below from the book Anatomy of the Ship: The Heavy Cruiser Takao.

In the distance of the screenshot, what looks to be the point of the break can be seen, very close behind the anchor.

Based on the narrowness of the ship's profile when compared to the ladder, this is probably the area of the chain locker. Several storage rooms were in this area, as were some trim tanks, and capstain systems to raise and lower the anchors.


These are excellent views of one of Chokai's Number 2 Model 5 catapults, added in the refits of the late 1930s and early 1940s. Overall, it is 64.3 feet long and just under four feet wide. Chokai carried three aircraft, at the time of her sinking these would have probably been Mitsubishi F1M2 Type 0 'Pete', and Aichi E13A1 Type 0 'Jake' reconnaissance aircraft.


No aircraft debris was reported from the wreck, and it's very probable that Chokai would have launched her planes, or simply jettisoned them over the side before the surface action off Leyte.


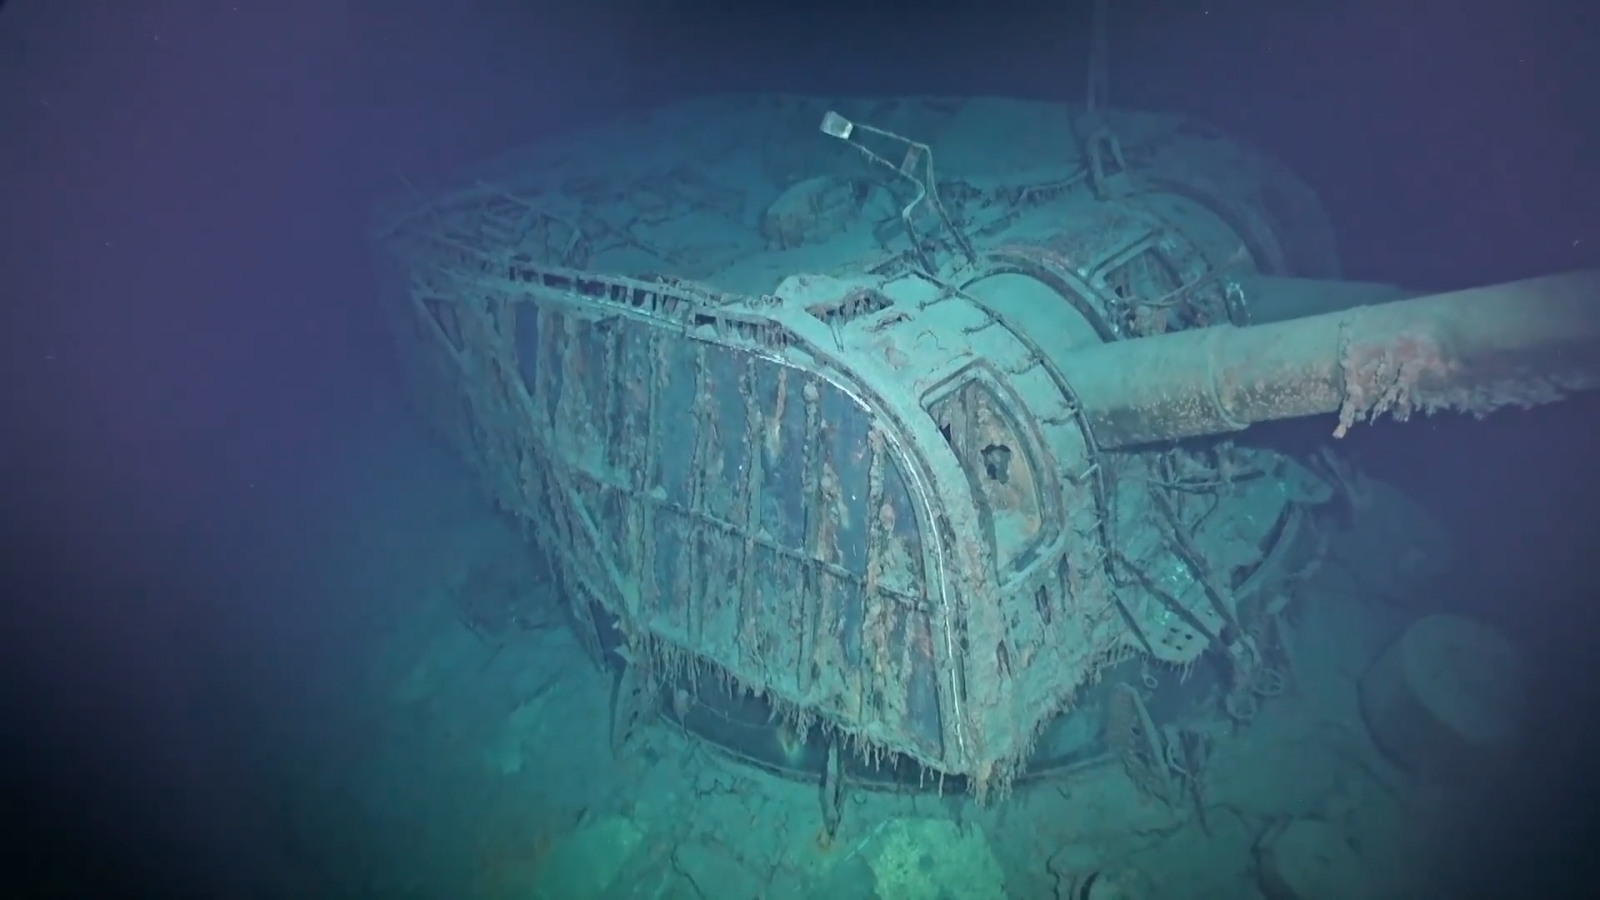
Turrets I and II, each mounting two 50 caliber 3rd Year Type 20 cm No. 2 guns. Under the terms of the London Naval Treaty, the maximum gun size for 'heavy' cruisers was set to 8 inches (203 millimeters), and Japan quickly designed this gun to get the largest possible gun for their heavy cruisers.

Turret I is showing the tremendous elevation these mounts (generally known as Model E mounts) were capable of, up to 70 degrees, which was because of the intent to use these as dual-purpose guns against aircraft. This wasn't very effective, as the turrets had a relatively slow traverse and elevation rates, a low rate of fire (and had to return to 5 degrees of elevation to reload), fragile elevation gear, limited recoil mitigation (which limited practical elevation to 50 degrees), and had to be linked into the AA director system which was a complex and time-consuming task.
These mounts were terrifyingly unarmored, only being protected by 1 inch (~25 millimeters) thick Ducol steel plates, with extra sheathing offset by about 4-6 inches (10-15 centimeters) to protect the turret crew from the heat of the sun. This sheathing can be seen in the bottom photo of Turret II.

This is the starboard side directly to the side of Turret III based on the davit. Some mushroom vents might be faintly visible in the right quarter, but even in the video it is unclear.


Battle damage, probably from a torpedo strike, which has revealed the belt armor over the magazines for the main battery. The upper part of this belt was 2.5 meters high and 127mm thick, and the lower part was 1.7 meters high and tapered from 76 to 38 mm. It looks like the torpedo broke off parts of the lower belt, and possibly pushed more of it back due to the force of the detonation.

Item 65 is the shell magazine (on what is known as the Store Deck), and 69 is the powder magazine. The paymaster's office is 61 (on the Middle Deck), and 63 is the quarters of an officer (on the Lower Deck).
Slightly farther back on the Middle Deck were more officer's cabins (Takao class ships had up to 55 officers by WWII), and on the Lower Deck was more of the same. On the Store Deck was the central telephone exchange and the fire control plotting and computer rooms.

The base of the starboard side of the bridge tower, with the barrels of Turret III visible on the far right side. Down below is a single 25mm mount, but these will be covered in more detail later.
The open hatch leads into a passageway, that is flanked by uptakes from the boilers and vents to them as can be seen in the diagram below. The vents for Boiler Room One are denoted by the '19' on the right side of the bridge tower.

The drawing below shows the extensive arrangement of vents and uptakes to serve the boiler rooms on the Takao class. These features were common on Japanese heavy cruisers, as they needed a large number of boilers (12 on the Takao class) to generate the power to attain the 30+ knot speeds desired by Japanese naval planners.

The 12 boilers generated steam to drive the four sets of geared Kampon turbines, producing a total of 130,000 horsepower, enough to drive Chokai and her sisters at up to 35 knots.

The protrusion on the front of the superstructure is apparently a tube to protect the leads for the antennas, the barrels of Turret III are on the right side, and the open hatch mentioned above can be seen on the lower left.

Up higher on the tower is a Type 96 triple 25mm/60 caliber mount, based on the French Hotchkiss machine gun in the mid-1930s, these guns were the main automatic AA weapon on Japanese warships. About 33,000 of these weapons were produced, in a mix of single, twin, and triple mounts.
Postwar analysis by the US Navy was not kind to these weapons, as they had several shortcomings. From most to least serious: multiple gun mounts had insufficient elevation and traverse speed both when operated manually and when powered, the sights weren't adequate to target high-speed aircraft effectively, when fired they vibrated so severely that it was difficult to keep an aircraft targeted, the magazine style (as opposed to the open clip style of the Bofors) of loading and small magazine size (all of which had to be reloaded by hand as there were no special tools made to assist in reloading) resulted in low sustained rates of fire, and the flash of the guns was enough to impair the mount crews.
It is actually somewhat unclear how many of each type Chokai carried when she was sunk, but at the least, she had two triples, six twins, and more than twenty singles.


Chokai and Maya didn't receive the same style of bridge reconstruction as Takao and Atago, retaining the extended compass platform that can be seen in the profile views below.

This is looking into the bridge itself, with the compass, speaking tubes, and the foundations for several sets of search binoculars. The exact internal layout looks to be a bit different from the diagram, but the function remained the same.

This is the Fire Control level, with the base for another net of binoculars on the right side, on the roof of the Compass Platform. Inside the windows is an open platform with even more optical equipment.

These binoculars look to be an 8 Centimeter set, Chokai had some binoculars with 12 Centimeter lenses, but it seems that most of these were lost when she sank.

This badly damaged area is the Main Gun Command and Communications Platform.
Chokai was given a 92 Shiki (Type 92) Sokutekiban fire control computer (which calculated course and speed of the target) when she was refitted in the late 1930s.

Looking down through the roof, the area in the foreground should be where the Type 92 computer was located, and parts of it look to be visible on the deck in the lower right of the upper photo and in the bottom center in the lower photo, but it's hard to tell since the only photographs known to the author is in the USN Technical Mission to Japan report O-31, and the quality of the photographs is very poor due to the scanning of the report.
But the report does provide a good explanation of how the system worked. Automatic inputs came from the main compass and each rangefinder (with nonfunctional ones or major outliers being discarded), and the crew of seven worked to input the ship's own speed, target speed, wind speed, and several other variables. Once all this information was in the Type 92, it was sent to the Type 94 (located on the Store Deck to the starboard side of Turret III), which generated gun elevation and turret training values which were then transmitted to the gun mounts. Range and deflection was also sent to the gun mounts from the Type 92.
On ships with full Remote Power Control, the turrets would automatically move and update to these values, but it doesn't seem that Chokai had full RPC.

This is the Survey Telescope Tower, which seems to be mostly for observation of a target with no apparent link to the fire control system.

In the front is the Main Director Tower (detail photo below), which had a crew of six that tracked a target, accounted for roll of the ship, and for the parallax errors that are inherent to optical systems.
In the back is the base for either a 4.5-meter or a 6-meter rangefinder, it's not clear which size Chokai had when she was sunk. This was one of several rangefinders that fed ranges into the Type 92.

Wonderfully, the ROV from Petrel made a long pass down the starboard side of the bridge tower, showing several of the levels.

The Main Gun Firing Platform.

This looks to be a modification to Chokai, as the hatch and binoculars just below the Firing Platform do not show up in drawings from the Anatomy of the Ship book. The last drawing that has the same general structure is dated to 1937 (seen above in the comparison between the 1937 and 1939 bridge towers), with that platform nowhere to be seen.

This is the Main Gun Command and Communications Platform again. Some search binocular bases can be seen here as well. The nearest hatch opens into a storeroom for the Sokuteki, and the farther hatch opens to a standby room, presumably for extra crew to operate the Type 92.

An external ladder can be faintly seen descending from the Sokuteki platform to the Fire Control Platform.

Based on the drawings, the binocular-less base in the enclosed area should be a torpedo director. Probably of the Type 97 variety, though the report about them from the USNTMJ (O-32) has no photographs.
On the left side near the edge is what remains of searchlight director position.

A bit farther down to the Compass Bridge.

Something that looks to be a compass base can be seen near the center, to the left of it are probably more binocular bases.
To the extreme left, faintly visible, is the base of a Type 91 high-angle fire director. This operated in a similar manner to the director explained above, but was able to point to higher elevations to track aircraft. Unfortunately, there doesn't seem to be a USNTMJ report about this particular system, so further details aren't available.

The forward starboard side torpedo tubes, this is a quadruple Type 92 mount, which would carry four Type 93 torpedoes, but it looks like the torpedoes in this mount were launched.
Before WWII the IJN was obsessed with torpedo attacks by destroyers and cruisers as the method to pare down the USN's battleship force before the Decisive Battle. This had almost no way to be as effective as they needed, and the oxygen fuel for the Type 93 (AKA the Long Lance) resulted in more than a few ships being sunk or seriously damaged from secondary explosions.

Chokai never received the newer 12.7 cm high angle mounts, retaining a battery of four 45 caliber 10th Year Type 12 cm guns until she was sunk. These mounts weighed 9.8 tons, had an effective rate of fire of between 6 to 8 rounds per minute, and could throw a 44.9 pound shell up to 32,800 feet at the maximum 75 degrees of elevation.

This is the torpedo loading crane on the starboard side, a necessity when each weapon weighed from 5,952 pounds up to 6,173 pounds depending on the model. Typically, 24 torpedoes were carried, sixteen of which were in the tubes, and the rest were stored around the funnel uptakes amidships as can be seen in the drawing below.

The torpedoes were moved by a system of tackle and rails mounted on the ceiling of the deck.

This is the loading port, without torpedoes. Presumably, they were jettisoned after Chokai was badly damaged because of the danger of having several thousands of pounds of explosives and compressed oxygen on the deck.

The rear set of tubes on the starboard side.

Another one of Chokai's 12 cm/45 guns.

Looping around the stern to the portside of Chokai. The can looking thing is a smokescreen generator, right beside a towing fairlead.

The inboard portside screw and rudder, Chokai had four screws and one rudder.

Like on some other Japanese cruisers that have been documented, the aft deck has totally caved in. Most of the volume in this area was comprised of crew quarters, but closer to the stern were several storerooms and rudder engine spaces.

The guns of Turret V, and the collapsed deck. Rather than crew quarters, the distilling plant for freshwater and refrigeration facilities were located right aft of the barbette.
Interestingly, the tops of Turrets V and IV are dished in.


A nice look at the 6-meter rangefinder on the top of Turret IV, and a partial look at the caved-in turret roof.

The base of the portside catapult, with a large box-like ventilator in the back, and parts of the seaplane hangar on the left side.


A single 25mm located in the middle of supports for a boat, presumably Chokai was carrying a lot fewer boats than she theoretically could. The damaged structure in the back is the seaplane hangar, which will be important later.


Another 12 cm/45 gun. This is another area where the lack of photographs and good drawings is an issue, since the area around the high angle guns was modified and tweaked several times through the history of the ships.

Slightly towards the bow and on a platform is a twin 25mm mount, which can be faintly seen in the photo of the 12 cm/45 gun.

Just off the end of the 12 cm/45 gun's splinter shield is another single 25 mm mount, and a perforated deck.

The rear portside torpedo mount.

The portside torpedo loading port with what looks to be some damage around the torpedo loading rack.

The last documented 12 cm/45 and the torpedo loading crane.

A higher view of the gun, its shield, and a davit for one of Chokai's boats hooked onto the shield.

The ROV dipped down to show the forward portside torpedo mount, which is also empty of torpedoes.


The general consensus since the 1940s was that White Plains was able to land a critical hit on Chokai's torpedoes, which resulted in a catastrophic explosion that doomed the ship. But it is clear that all of the torpedo tubes and the storage areas are intact (at least from battle damage), not at all consistent with the damage seen on other ships that were lost because of their torpedoes like Mogami.
The question now becomes what exactly caused the damage that disabled the ship?
Despite there being no survivors, it is known that something blew up on Chokai and caused her to sheer out of line. There wasn't a pass down the centerline of the wreck, so it's possible that the shell struck the compressor for the torpedoes or aviation stores below in the area of the hangar. Fires of that kind would be very difficult to put out, and would be more than able to damage the turbines or other critical parts of the machinery even though they were below the armor deck.
Without a more comprehensive survey of the area, it's hard to say for sure, though it is the opinion of the author that White Plains can still be given credit for landing the hit that knocked Chokai out of the battle for good.


Rising up and heading towards the bow, the counterpart davit can be seen on the right side of the frame.

This is the base of the bridge tower, with two single 25mm guns. The open hatch is the counterpart to the one mentioned near the beginning of this post.


There were alleged plans to convert Chokai into an 'AA Cruiser' like her sister Maya (Whose wreck has been covered here: The Wreck of the Maya) by removing Turret III, replacing the 12cm/45 guns with 12.7cm/40 twin mounts, and adding several more 25mm mounts around the ship. Obviously, Chokai was sunk before she could return to Japan for this extensive rebuild.

The sliding door on the rear of Turret II is either open or missing, leaving the rangefinder compartment open. Petrel's ROV didn't get particularly close to the hatch, so the interior was unseen.
The cylinder on the roof of Turret III is the gun captain's periscope, allowing him a good view outside of the confines of his turret. His position was right under the periscope, directly between the breeches of the two 20.3cm guns as can be seen in the diagram below from Anatomy of the Ship.


The offset thermal plates and their supports are very apparent on the rangefinder, and the periscope on Turret II can also be seen.


And around at last to the skyward pointing barrels of Turret I, and the end of the released information about the wreck.
Sources:
http://combinedfleet.com/chokai_t.htm - General History
http://navypedia.org/ships/japan/jap_cr_takao.htm - Technical Information and Refit History.
Anatomy of the Ship: Heavy Cruiser Takao. Skulski, Janusz. - General History, Internal Layout, and Detailed Diagrams of Construction.
http://bulletpicker.com/us-navy-technical-mission---ja.html - Source for USN Technical Mission to Japan Reports.
https://ww2db.com/photo.php?list=search&sp=&startRow=0&keyword=&source=all&color=all&foreigntype=S&foreigntype_id=471&dt=&image_id= - Photographs of the Takao class, including Chokai.
Armament
http://www.navweaps.com/Weapons/WNJAP_8-50_3ns.php - 8''/50 Main Battery.
http://www.navweaps.com/Weapons/WNJAP_47-45_10ns.php - 12cm/45 Heavy AA Battery
http://www.navweaps.com/Weapons/WNJAP_25mm-60_mg.php - 25mm/60 Automatic AA Battery.
http://www.navweaps.com/Weapons/WTJAP_WWII.php#61_cm_%2824%22%29_Type_93_%281933%29_Model_1%2C_Mod_1%2C_Mod_2_and_Mod_3 - Type 93 Torpedoes.
Another great summery thanks, it's a interesting mystery how she was disabled. I wonder if the deck damage over the port side torpedo mount might be signs of the battle damage that disabled her?
ReplyDeleteChokai was a graceful cruiser, in my opinion seeing and it is clear that most Type 92 launchers are relatively intact. Which means Kitkun Bay's 200 pound bombs have penetrated the chimney, causing direct engine damage and dismantling the rudder. I love this cruiser, but you can consider that Chōkai-san was crippled by Kitkun Bay bombs.
ReplyDeleteAgreed, the Aircraft Action Reports for VC-5 (Composite Squadron 5 on Kitkun Bay) dated Oct 25, 1944 were very detailed. They have the much better claim for disabling the Chokai. Three TBM- 1c led by Lt. Cdr Fowler made a textbook glide bomb out of the sun, 30 deg off the unengaged starboard bow. Each TBM-1c dropped four M58 500-lb semi-armor piercing bombs with AN/M101A2 tail fuzes set to explode after 0.025 seconds delay. A diagram in the report showed three groups of hits claimed on and around the bow around No.1 turret, around the for'd funnel and one in the extreme stern.
DeleteThe position of the three hits claimed on the bow showed one on the left hand side of the turret and two just for'd of it. Might explain the missing left hand gun of No.1 turret and the extreme elevation of the right hand gun(!) The torpedo damage from the scuttling was further for'd near the anchor, so, that may not be the cause.
The collapsed aft deck and eye witness reports of the Chokai "sheering away" immediately after a hit on the stern would tend to confirm the claim of a single hit in the extreme stern.
The verifiable accuracy of these claims would tend to give confidence that four hits claimed around the for'd funnel would also be accurate. If they were, the 500-lb SAP bombs would penetrate the 37mm armored deck and explode inside the for'd boiler rooms - destroying most of the 12 boilers ... This would be quite sufficient to cause the Chokai to go dead in the water ...
R Cheung
These are great pictures. Too bad the Petrel people are being coy about the location the ship was found. I covered the fate of Chokai in my book "The Defenders of Taffy 3." Thanks for posting them.
ReplyDeleteByron Como